Part 2: Single-sample analysis
Now that we have a clear overview of what we want to achieve, we can start writing code! We are going to do this in four steps:
- Create the modules that are going to perform each task
- Create a
taxoflow.nfcontaining the core logic of the pipeline - Create a
main.nfentrypoint workflow - Create a
nextflow.configconfiguration file
Then we will test that we can run the pipeline and that it produces the expected outputs.
1. Create the modules
You can think of modules as building blocks that we can string together to form an assembly line. Each module corresponds to a step in the pipeline.
1.1. Initial quality control with FastQC
As noted in the method overview, the objective of this module is to assess the quality of the raw paired-end reads before any trimming or filtering is applied.
Let’s create the fastqc.nf file inside the single/modules/ folder and write the following code:
| single/modules/fastqc.nf | |
|---|---|
1 2 3 4 5 6 7 8 9 10 11 12 13 14 15 16 | |
Let’s take a moment to break down what we are seeing here.
First, let’s look at the ‘housekeeping’ parts of the process, which you should be familiar with if you worked through the beginner Nextflow training.
- The process name is
FASTQC, this is important when creating the workflow file. - The
tagdirective is used to indicate which sample is being processed at a determined moment. This will be useful when running the pipeline. containerindicates the docker container with which the process will be run. We have retrieved all the containers from Seqera Containers.
Container images and profiles
Please keep in mind that we are using Docker images. If you want to use Apptainer/Singularity images, please refer to the HPC installation section. It is also possible to control the container/manager technology used in every execution. This is achieved by creating specific profiles according to the wished behavior of the pipeline, more here.
Now let’s have a look at the interesting bits!
1.1.1. Process inputs
The input for this process is a tuple containing the sample id and the paired-end reads (forward and reverse FASTQ files).
We’ll go over how this channel is built when we create the main.nf file.
1.1.2. Process outputs
This process emits two separate channels: one for the *_fastqc.zip archives and one for the *_fastqc.html reports.
The HTML files are meant for interactive inspection in a browser; the ZIP archives contain the underlying data and plots used to build those reports.
emit:
You see that a the end of each output there is an emit: statement. This is useful to name file or set of files to later refer to them when calling the ouput of the process. This way offers a practical way to track the resulting outputs of a process. More about this when defining taxoflow.nf file.
1.1.3. Command script
The script block runs a single fastqc command on both read files at once.
FastQC will generate one HTML report and one ZIP file per input FASTQ.
To learn more about how to interpret the modules and plots in these reports, see the FastQC help pages.
1.2. Read trimming and quality re-estimation using Trim Galore
As noted in the method overview, the objective of this module is to remove adapter sequences and low-quality bases from the reads, and to re-run quality control on the trimmed data.
Let’s create the trimgalore.nf file inside the single/modules/ folder and write the following code:
| single/modules/trimgalore.nf | |
|---|---|
1 2 3 4 5 6 7 8 9 10 11 12 13 14 15 16 17 18 | |
Once again, this module follows the same structure as the previous process.
The directives tag and container play the same role.
Note that Trim Galore and FastQC share the same container image in this pipeline, because the Trim Galore image bundles both tools.
1.2.1. Process inputs
The input is the same tuple as for FastQC: the sample id and the paired-end reads.
Trim Galore receives the raw reads directly from the input channel, in parallel with the initial FastQC step.
1.2.2. Process outputs
This process produces several outputs:
- a tuple with the
sample idand the paths to the trimmed forward and reverse reads (*_val_1.fq.gzand*_val_2.fq.gz), which are passed on to Bowtie2; - a trimming report (
*_trimming_report.txt) summarizing how many bases were removed; - FastQC HTML and ZIP reports for each trimmed read file, allowing you to compare quality before and after trimming.
1.2.3. Command script
The script block runs Trim Galore with three important flags:
--pairedtells Trim Galore to treat the reads as paired-end and to trim them accordingly;--fastqcruns FastQC automatically on the trimmed reads;- the two input FASTQ paths are passed as
${reads[0]}and${reads[1]}for the forward and reverse files, respectively.
You are encouraged to check the Trim Galore documentation for additional options, such as adjusting quality thresholds or adapter sequences.
1.3. Remove host sequence with Bowtie2
As noted in the method overview, the objective of this module is to clean the reads by aligning them against a reference genome and remove any reads that map to that reference.
Let’s create the bowtie2.nf file inside the single/modules/ folder and write the following code:
| single/modules/bowtie2.nf | |
|---|---|
1 2 3 4 5 6 7 8 9 10 11 12 13 14 15 16 17 18 | |
Resources
The parameter -p is used to indicate how many cores or threads we want to use for this tool. The name of the parameter can change (i.e. in Kraken2, it is called --threads), and we can control the number of cpus assigned to each process with this kind of parameters. In Nextflow, there is a really convenient way to centralize these resources, assigning them to each process according to the requirements; this is an adavanced control feature that you can explore here.
At first glance, you can see that it follows the same structure as the later processes.
The directives tag and container play the same role.
1.3.1. Process inputs
The input for this process will be the sample id, the paired-end reads, as well as the path to the bowtie index.
We’ll go over these in more detail when we create the main.nf file.
1.3.2. Process outputs
This process will produce a tuple containing the sample id, the path to the cleaned reads and the path to the *.sam file.
The SAM file contains the information about the alignment of the sequences against the reference indexed genome. To learn more about this format, please see the SAM format specification.
1.3.3. Command script
The script block contains two commands:
-
An environment variable is exported pointing to the directory where the indexed genome is stored. This is required by Bowtie2. If you plan to use another reference genome, you will need to adapt this path pointing to the indexed genome.
-
The Bowtie2 command that includes again the path to the indexed genome. The
-1and-2arguments capture the path to forward and reverse reads, respectively.The-Sargument sets the desired format output. The--un-conc-gzargument is used to write out any paired-end reads that fail to align concordantly to the reference genome. It is important to keep that these are the reads we are actually looking for, and therefore the ones we are passing to next process (Kraken2) to proceed with the taxonomic classification. To learn more about this parameter, see the Bowtie2 manual.
1.4. Apply taxonomic classification with Kraken2
Now, let’s create the module for our taxonomic classifier.
Let’s create kraken2.nf file inside the single/modules/ folder and write this code:
| single/modules/kraken2.nf | |
|---|---|
1 2 3 4 5 6 7 8 9 10 11 12 13 14 15 16 17 18 19 20 21 22 23 | |
At first glance, you can see that it follows the same structure as the previous process.
The directives tag and container play the same role.
1.4.1. Process inputs
The input in this case is a tuple containing the sample id, the cleaned reads and the *.sam file.
This one is declared just to maintain the correspondence between the output from Bowtie2 and the Kraken2 input.
Also, the path to the Kraken database is declared.
We’ll go over this in more detail when create the main.nf file.
1.4.2. Process outputs
The output from this process will be a tuple containing the sample id, the path to the .k2report file, as well as the path to the .kraken2 file.
1.4.3. Command script
This is a standard Kraken2 command that specifies the following arguments:
- the path to the database
- the number of threads to use
- the path to the reports Kraken2 generates
- the minimum number of ‘hit groups’ needed to make a classification call
- the flag to report the minimizers and distinct minimizer count
- the parameters that indicate that the received reads are paired-end and compressed in a .gz format.
You are strongly encouraged to check out both the protocol that documents this methodology, as well as the source publication to understand how Kraken2 works and the type of files it generates. This article about minimizers may also be useful.
1.5. Apply Bayesian re-estimation of species abundance with Bracken
Let’s create the file bracken.nf inside single/modules/ and write the following code:
| single/modules/bracken.nf | |
|---|---|
1 2 3 4 5 6 7 8 9 10 11 12 13 14 15 16 17 18 19 20 | |
Once again, this module follows the same structure as the previous process.
The directives tag and container play the same role.
1.5.1. Process inputs
The declared input for this Bracken process matches the output generated by Kraken2. It expects to receive a tuple containing the sample id and the paths to .k2report and kraken2 reports. It requires also the read length (length) to compute the probabilities, as well as the path to the database (kraken2_db)
1.5.2. Process outputs
Similarly, the output establishes that this process will generate a tuple with the sample id and the two types of reports Bracken produces.
You can find more information about these reports in the here.
1.5.3. Command script
The Bracken command specifies the following arguments:
- the path to the database
- the input represented by the Kraken2 report
- the length of the reads
- the taxonomic level at which we want to re-estimate the abundance (species in this case)
- the required number of reads before abundance estimation to perform re-estimation
- the format for the output reports
1.6. Generate plots with Krona
Krona plots are interactive pie charts that are widely used in the metagenomics field.
To generate them, we will need two distinct processes; one to extract species abundance metrics from the Bracken report, and another to render the Krona plot itself based on that file.
1.6.1. Extract the species abundance metrics
Let’s create the file kReport2Krona.nf inside single/modules/ and write the following code:
| single/modules/kReport2Krona.nf | |
|---|---|
1 2 3 4 5 6 7 8 9 10 11 12 13 14 15 16 17 | |
As before, this process takes as input the exact output from Bracken in a tuple form, and it is going to generate another tuple containing sample id and the *.txt file with the abundance metrics.
The command will run a script called kreport2krona.py that is provided as part of KrakenTools and uses the Bracken report as input to produce a plain text file containing the species abundance information.
Note that the command includes an additional flag to leave out non-traditional ranks. For more information about that option, see the KrakenTools documentation referenced above.
1.6.2. Extract the species abundance metrics
Let’s create the file ktImportText.nf inside single/modules/ and write the following code:
| single/modules/ktImportText.nf | |
|---|---|
1 2 3 4 5 6 7 8 9 10 11 12 13 14 15 16 | |
This process takes as input the plain *.txt in a tuple with the sample ID, and uses Krona to render the Krona plot in a self-contained *.html file, which is the final output of our pipeline at this stage.
The Krona plot can be opened in a standard modern browser, just like the one you are using to follow this tutorial.
This completes the implementation of the modules we need for the single-sample use case, so we can now move on to creating the files that will describe the workflow and control its execution.
2. Create taxoflow.nf
There are several strategies for building Nextflow workflows.
Here we are going to use a composable workflow structure as described in the Workflows of Workflows Side Quest, which uses an entrypoint workflow in a single/main.nf file, an embedded single/taxoflow.nf file containing the core logic of the workflow, and the take syntax to declare inputs.
Let’s start by creating the single/taxoflow.nf file that will the core logic of the workflow.
Note that we create this file in our single/ directory, NOT in single/modules/.
We start by adding the following code to import modules:
| single/taxoflow.nf | |
|---|---|
1 2 3 4 5 6 7 8 9 10 | |
Here we list all the modules that we wish to import into the workflow using the standard include syntax.
This consists of two parts: invoking the name of the process inside the curly brackets, and pointing to the relative path where the files are located.
Note that the process names should match exactly how they are written in the module files.
Now, let’s write the workflow itself. We need to declare the primary input for the workflow and invoke the processes on the appropriate inputs.
| single/taxoflow.nf | |
|---|---|
12 13 14 15 16 17 18 19 20 21 22 23 24 25 26 27 28 29 30 31 32 33 34 35 36 37 38 39 40 41 42 43 44 | |
In this declaration you see that we need three primary inputs for the pipeline: the indexed reference genome for Bowtie2, the indexed database for Kraken2 and Bracken, and the paths to the reads; when creating the nextflow.config, you will see how to specify these paths.
In the block main, you see the names of the processes with one or more parameters inside the parenthesis depicting the exact data flow:
FASTQC(reads_ch)andTRIM_GALORE(reads_ch)will be the first executed processes in parallel using the raw reads; the other processes must wait untilTRIM_GALOREis finished.BOWTIE2(TRIM_GALORE.out.trimmed_reads, bowtie2_index)will received the trimmed reads fromTRIM_GALOREto execute its task using the clean sequences and the indexed genome.- Once
BOWTIE2has completed the task,KRAKEN2will take the output, along with the database path to perform the specified task; the remaining processes are on hold until Kraken2 is finished. BRACKEN, in turn, will takeKRAKEN2output to run the abundance re-estimation using the same database;K_REPORT_TO_KRONAandKT_IMPORT_TEXTcan not be run untilBRACKENis finished with its task.- Finally,
K_REPORT_TO_KRONA, and subsequentlyKT_IMPORT_TEXT, will be run to generate our final goal file which is the Krona plot.
2.1. The emit block
At the end of the TaxoFlow workflow you will notice an emit block.
This is how a composable workflow declares its outputs: the channels that another workflow (our main.nf entrypoint) can use after TaxoFlow has run.
Each line gives a short name to a process output, using the form name = PROCESS.out.<channel>.
For example:
fastqc_zip = FASTQC.out.zipforwards the ZIP reports from FastQC. The.zippart refers to theemit: ziplabel we set in thefastqc.nfmodule.trimmed_reads = TRIM_GALORE.out.trimmed_readsexposes the trimmed reads produced by Trim Galore.
You only need to list the results you want to keep or inspect later.
The names you choose here (krona, bracken_class, and so on) will show up again in main.nf, where we connect them to the publish block.
3. Create the main.nf entrypoint workflow
We are getting closer to running the pipeline!
Let’s create the single/main.nf file.
Then we add an include statement to import the TaxoFlow workflow from the single/taxoflow.nf file, as well as a workflow block that sets up an input channel and invokes it:
| main.nf | |
|---|---|
1 2 3 4 5 6 7 8 9 10 11 12 13 14 15 16 17 18 19 20 21 22 23 24 25 26 27 28 29 30 31 32 33 34 35 36 37 38 39 40 41 42 43 44 45 46 47 48 49 50 51 52 53 54 55 | |
Within this file, we create a banner with the pipeline name to be shown when the execution starts using log.info.
log.info is a method call on a logging object, and can be used to write informational messages to the Nextflow log during a pipeline’s execution.
You can learn more about this here.
| single/main.nf | |
|---|---|
4 5 6 7 8 9 10 11 12 13 14 15 16 17 18 19 20 21 22 23 24 | |
Let’s break down the rest of this file.
3.1. Setting up the input channel
params.reads takes the path to the paired-end reads, using the channel factory fromFilePairs to build a channel of paired FASTQ files.
The result is reads_ch: a channel of tuples with the sample ID and the two read files.
Input reads
This way of providing the path to the reads requires the use regular expressions. Fortunately, in this case you just need to know the specific expected pattern by this paramater: name_of_the_files{1,2}.fastq.gz. More about this here.
3.2. Calling TaxoFlow
The line TaxoFlow(params.bowtie2_index, params.kraken2_db, reads_ch) runs our core workflow. This statement is really explicit in terms of the requirements, which are the path to the Kraken2 database, the indexed genome for Bowtie2 and the reads.
The three arguments match the three inputs declared in the take: block of taxoflow.nf.
3.3. The publish block
After calling TaxoFlow, the publish block selects which emitted channels should be saved to your results folder.
Each line connects a label to the matching output from the subworkflow, for example:
fastqc_zip = TaxoFlow.out.fastqc_zip
The name on the left-hand side must match an entry in the output block below.
Channels that are not listed here will not be copied to the output directory (although they may still exist in Nextflow’s work directory while the run is in progress).
3.4. The output block
The output block tells Nextflow where to place each published file on disk.
For each name from publish, we specify a subdirectory such as path 'kraken2' or path 'krona'.
These folders are created inside outputDir, which we configure in nextflow.config in the next section.
When the pipeline finishes successfully, you will find your result files organized in these folders under the output directory.
4. Create the nextflow.config configuration file
Finally, we create the file single/nextflow.config, where we’ll set up the configuration of our pipeline.
This is where we provide default input parameters, define the output folder for the pipeline and enable the use of Docker containers.
| single/nextflow.config | |
|---|---|
1 2 3 4 5 6 7 8 9 10 11 12 13 14 15 16 17 18 | |
Importantly,
-
workflow.output.modedefines if we want hard copies ('copy') of the files or just symlinks (default mode) to the files that will be located within the working directory (theworkdirectory created during each Nextflow’s execution). -
outputDiris a Nextflow variable used to set the output directory. Here we use theparamoutdirthat can be controlled via CLI to use any other name for the output folder.
Paths to files and directories
We are providing the paths using the Nextflow ${projectDir} variable to point to the project directory directly; this ensures system independence. Usually, relative paths are preferred for system-independence of the pipelines, although some tools or scripts will fail if parameters are not provided as absolute paths. Likewise, please notice the paths to the database and indexed genomes, these must be changed in case you want to use a different genome and an alternative database. More about this here.
Override parameters
Parameters can be overridden at run time when included as command flags. You can learn more about this on Nextflow parameters. For example:
nextflow run main.nf \
	--reads "path/to/reads" \
	--outdir "path/to/outdir" \
	--bowtie2_index "path/to/bowtie2/index" \
	--kraken2_db "path/to/kraken2/database" \
    -- read_length N
5. Run the pipeline
That’s it, we are all set to run the pipeline!
Let’s just pick one of the samples provided (you can choose any of them) and run the following command:
mv data single/
cd single
nextflow run main.nf --reads 'data/samples/ERR2143768/ERR2143768_{1,2}.fastq.gz'
On the output of the command line, you will see:
Single-sample execution
N E X T F L O W   ~  version 25.10.4

Launching `main.nf` [determined_lorenz] DSL2 - revision: 8f65b983e6

	___________________________________________________________________________________________________
	___________________________________________________________________________________________________
            >===>>=====>                                 >=======>  >=>
		>=>                                      >=>        >=>
		>=>        >=> >=>  >=>   >=>    >=>     >=>        >=>    >=>     >=>      >=>
		>=>      >=>   >=>    >> >=>   >=>  >=>  >=====>    >=>  >=>  >=>   >=>  >  >=>
		>=>     >=>    >=>     >>     >=>    >=> >=>        >=> >=>    >=>  >=> >>  >=>
		>=>      >=>   >=>   >>  >=>   >=>  >=>  >=>        >=>  >=>  >=>   >=>>  >=>=>
		>=>       >==>>>==> >=>   >=>    >=>     >=>       >==>    >=>     >==>    >==>
	___________________________________________________________________________________________________
	___________________________________________________________________________________________________

    executor >  local (7)
    [2f/3e9520] TaxoFlow:FASTQC (ERR2143768)            [100%] 1 of 1 ✔
    [a9/4bc888] TaxoFlow:TRIM_GALORE (ERR2143768)       [100%] 1 of 1 ✔
    [e4/84c903] TaxoFlow:BOWTIE2 (ERR2143768)           [100%] 1 of 1 ✔
    [7b/13c639] TaxoFlow:KRAKEN2 (ERR2143768)           [100%] 1 of 1 ✔
    [45/b44c39] TaxoFlow:BRACKEN (ERR2143768)           [100%] 1 of 1 ✔
    [1f/3d7684] TaxoFlow:K_REPORT_TO_KRONA (ERR2143768) [100%] 1 of 1 ✔
    [59/5b2453] TaxoFlow:KT_IMPORT_TEXT (ERR2143768)    [100%] 1 of 1 ✔
    Completed at: 19-May-2026 17:43:27
    Duration    : 4m 1s
    CPU hours   : 0.1
    Succeeded   : 7
Use your own data
If you want to use your own data, you just need to change the path indicated with the --reads parameter.
If that worked for you, it’s finally time to analyze the results!
Indexed genome and database
Please keep in mind that we are using an indexed genome and database that do not confer explicit biological interpretation, and thus the results are NOT meaningful. Please make sure that you checked the corresponding section.
You can find all the output files in the output/ directory by running the tree command:
tree output
You should see the following:
Output directory content
output/
├── bowtie2
│   ├── ERR2143768.1
│   ├── ERR2143768.2
│   └── ERR2143768.sam
├── bracken
│   ├── ERR2143768.bracken
│   └── ERR2143768.breport
├── fastqc
│   ├── ERR2143768_1_fastqc.html
│   ├── ERR2143768_1_fastqc.zip
│   ├── ERR2143768_2_fastqc.html
│   └── ERR2143768_2_fastqc.zip
├── kraken2
│   ├── ERR2143768.k2report
│   └── ERR2143768.kraken2
├── krona
│   └── ERR2143768.krona.html
└── trimming
    ├── ERR2143768_1.fastq.gz_trimming_report.txt
    ├── ERR2143768_1_val_1_fastqc.html
    ├── ERR2143768_1_val_1_fastqc.zip
    ├── ERR2143768_1_val_1.fq.gz
    ├── ERR2143768_2.fastq.gz_trimming_report.txt
    ├── ERR2143768_2_val_2_fastqc.html
    ├── ERR2143768_2_val_2_fastqc.zip
    └── ERR2143768_2_val_2.fq.gz
Please feel free to explore each of the files to understand each process and how data were handled.
The file we are most interested in is the *.html file within krona/ containing the Krona plot.
You can either download it and open it in your browser, or install the preview extension for Visual Studio. Below you can see a snapshot of how it should look like (keep in mind that this is the Bracken output!):
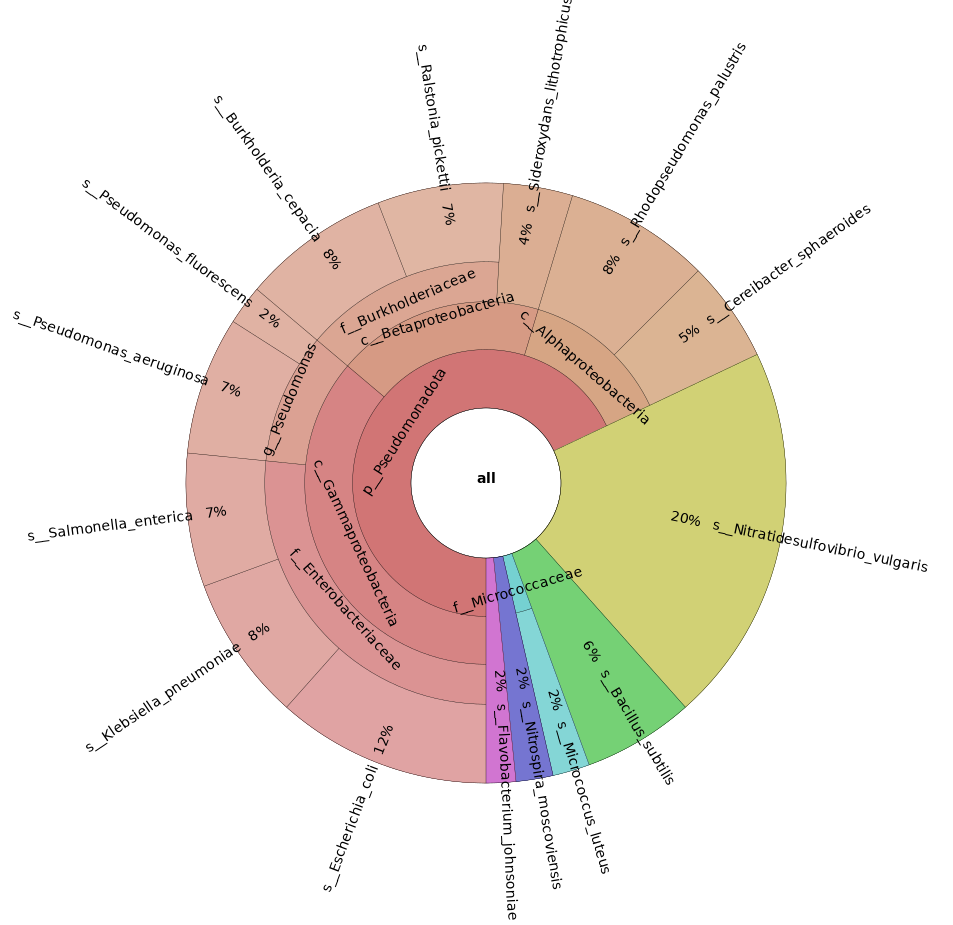
Takeaway
Congratulations! You just have performed a taxonomic annotation and abundance estimation of your metagenomics sample.
What’s next?
Learn how to modify the workflow to process multiple samples in parallel, create a report with different diversity measurements, execute customized scripts, and use Nextflow operators and conditionals to control the workflow.